The Ultimate Recipe for Perfect Siu Yuk (烧肉)—Crispy Pork Belly, Every Single Time.

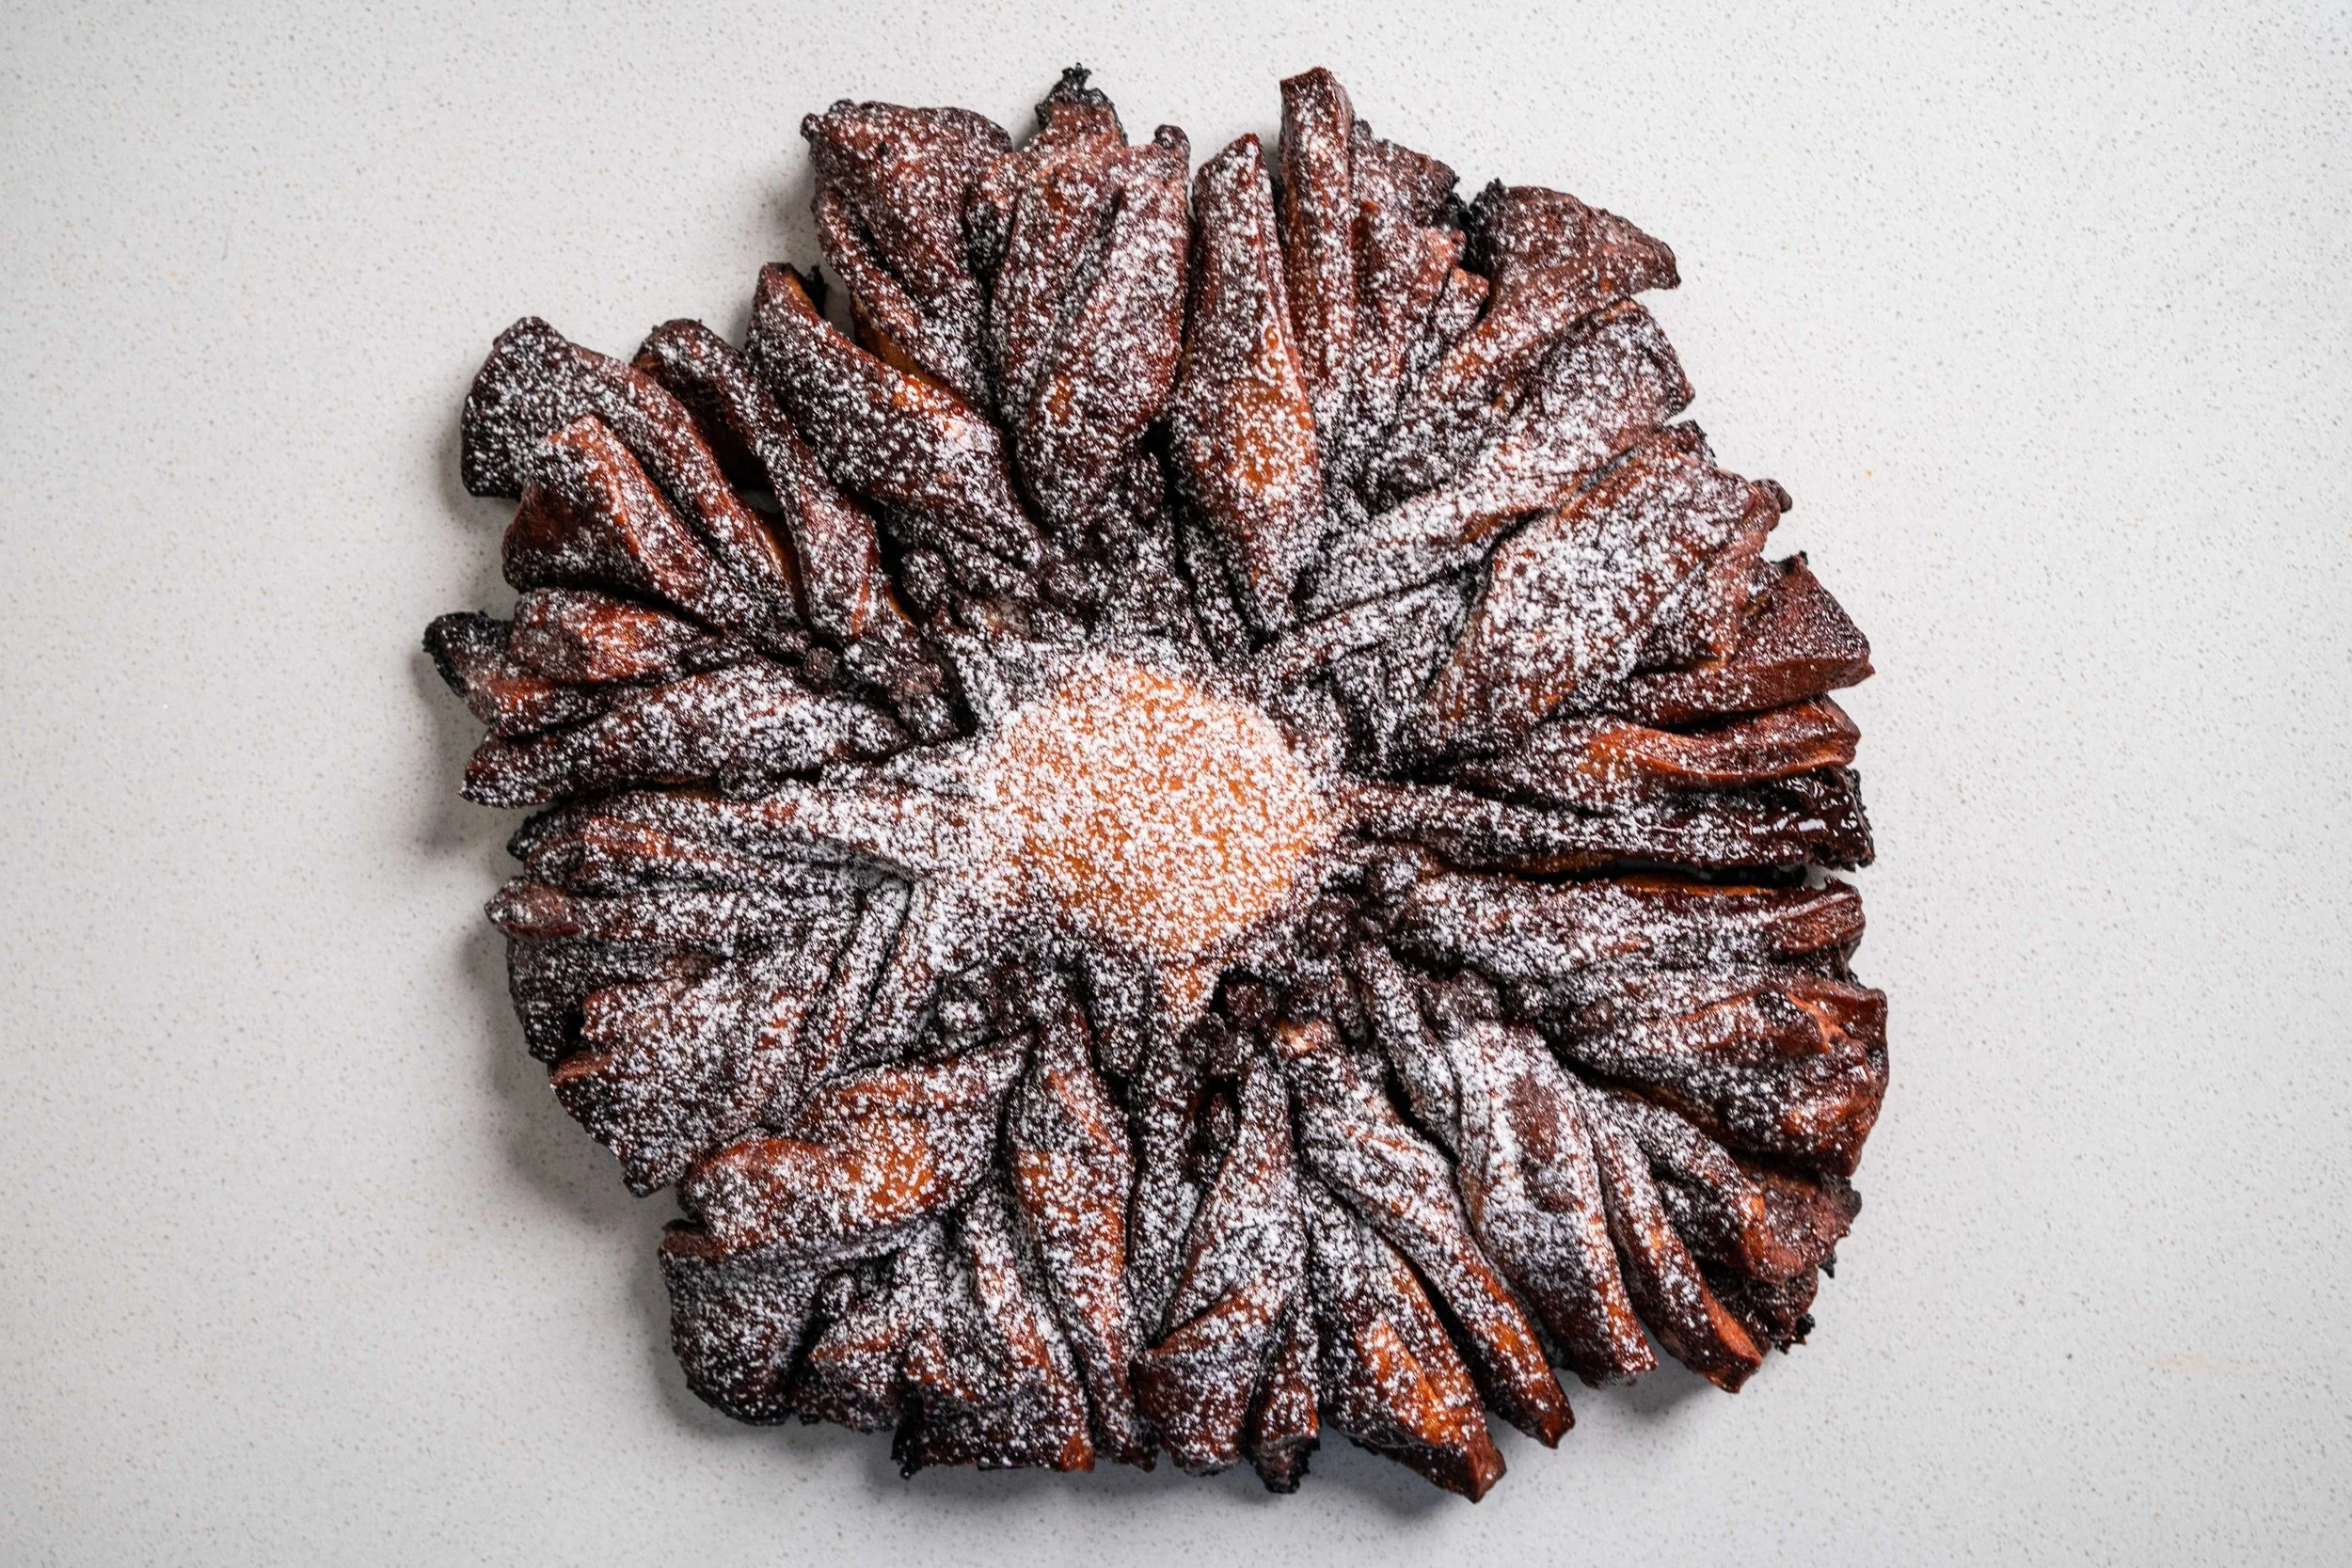
In the world of cooking, there’s a perennial quest for crispiness. We have a fondness for fried food, we ooh and ahh as sourdough skins and croissant crusts shatter into shards, we want forks to rattle as we drag it across the skin of pan-fried chickens—Mandy Lee makes the crispiest one I’ve seen (and heard)—and we have a fondness for fries, chips, and crisps. But the ultimate pinnacle of joy for the crispy crowd has to be a dang good siu yuk (Cantonese roast pork belly), a dish known for its shatteringly crispy pork skin that sits atop a melting, jelly-like layer of pork fat, on top of a stump of melting, tender meat.
Siu yuk is a Cantonese classic that’s found in many parts of Asia, and in Canto-Chinese restaurants in Chinatowns across the world too. If you’re more familiar with porchetta, this is the Asian version of that, only less daunting and—pardon my bias—arguably more flavourful. While it might not be difficult finding a place that serves siu yuk, a spectacular one is truly a rare find. And attempting to make it at home can be quite the crapshoot. So, that’s where this super trusty guide and recipe you’re reading comes in!
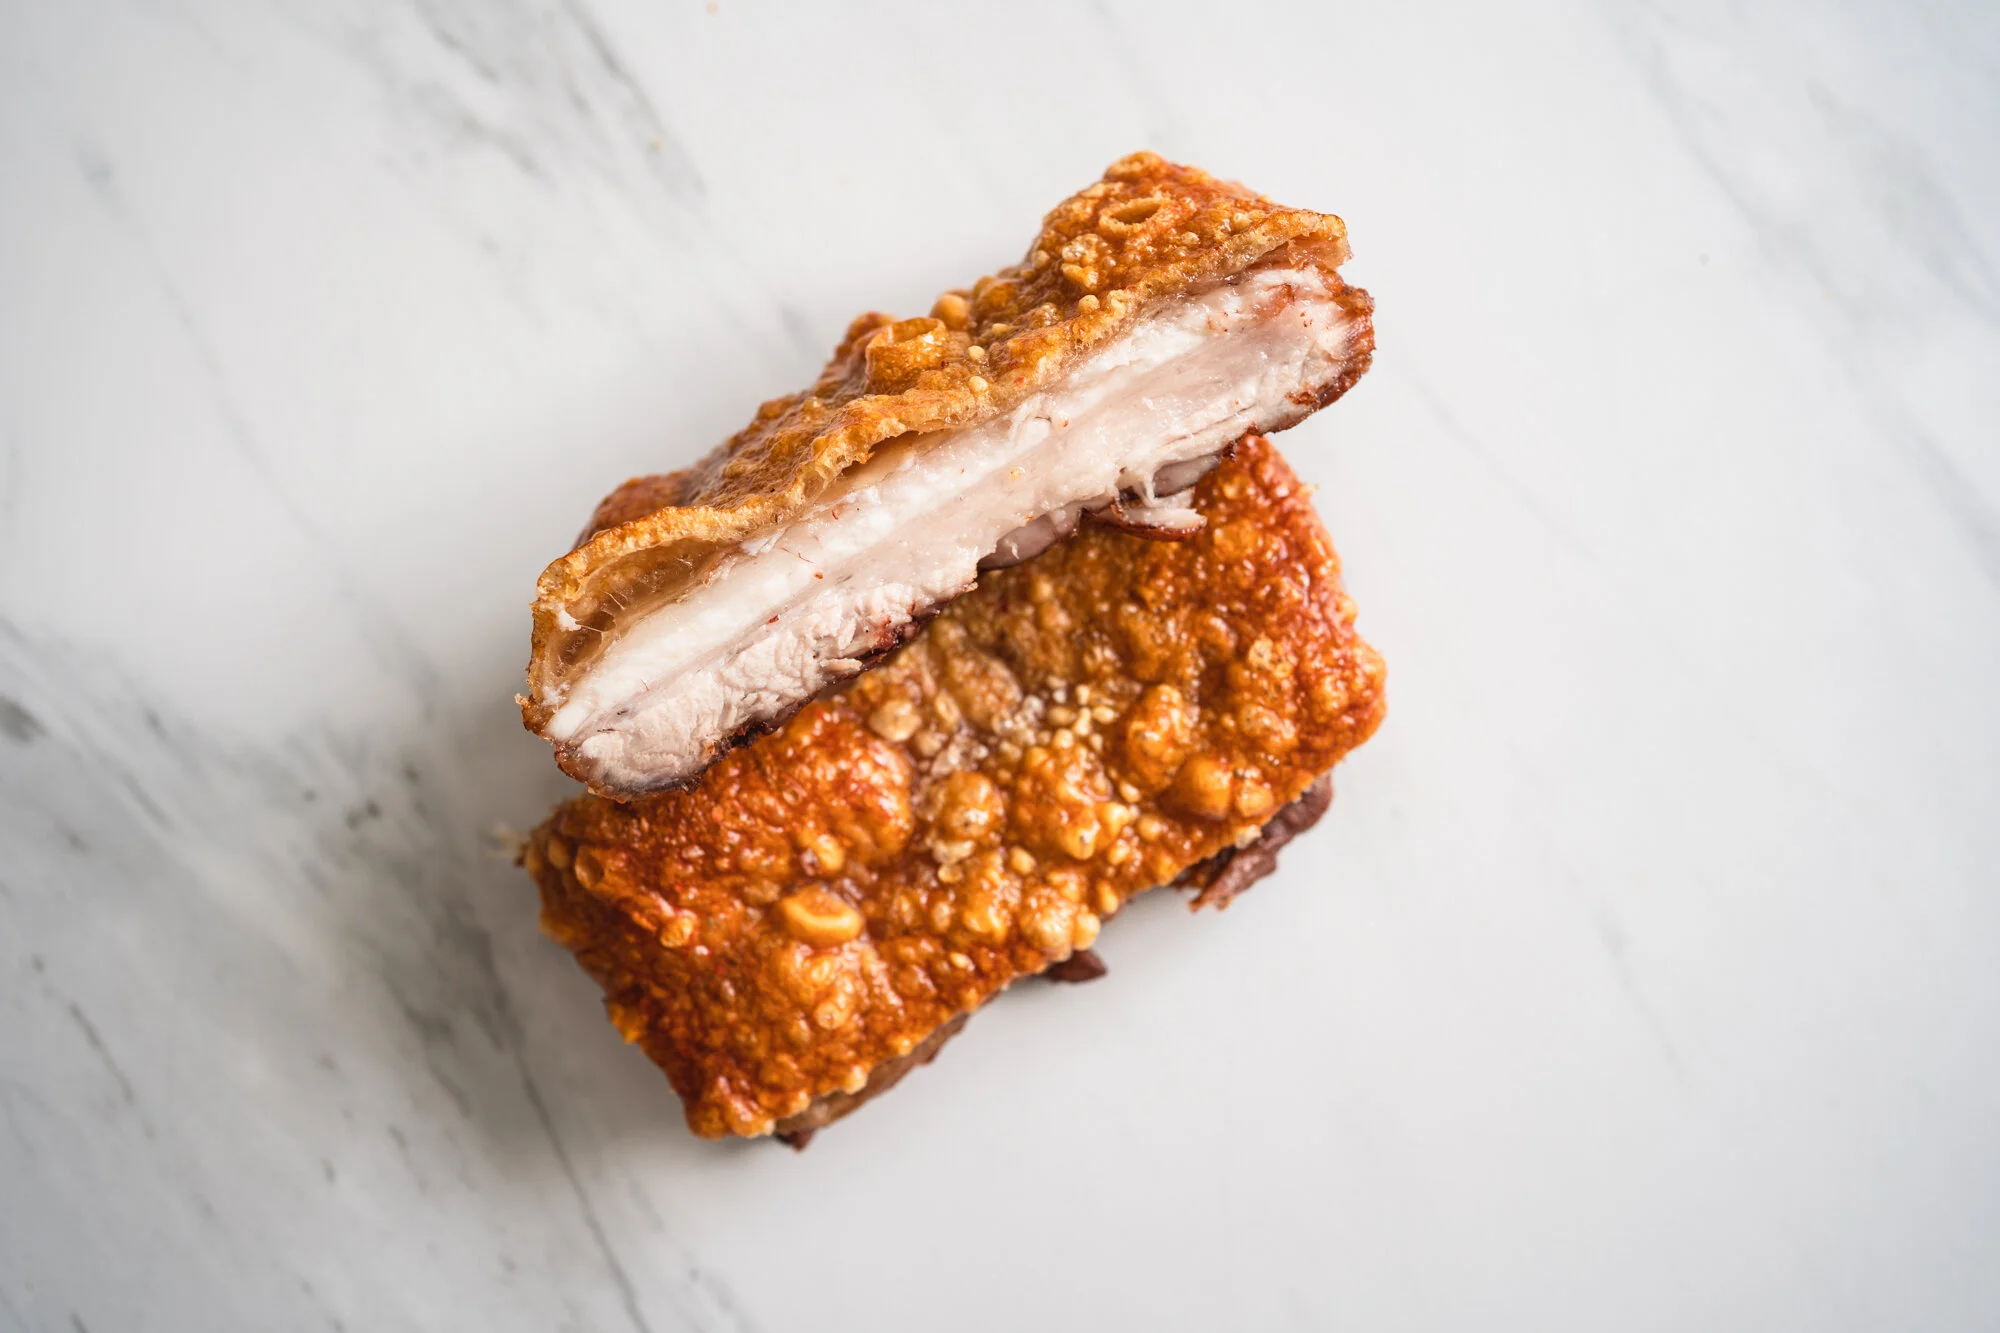
Now, I’m not a big fan of absolutes. I almost never use them, much less in a recipe title. But when it comes to this siu yuk recipe, '“ultimate” and “perfect” are two words that easily came to mind. The recipe is an updated version of one of my earliest on the blog, a treasure of a recipe passed down to me from my mom. On that first post back in 2017, I wrote that “for a (Chinese) home cook, making a great siu yuk is the ultimate accomplishment – get it right and you’ll be forever immortalised in your friends’ and family’s memories as the home cook they secretly want to be, get it wrong and you’d rather cancel that dinner party you painstakingly planned than face the public scrutiny of your sub-par siu yuk.” And this recipe will land you firmly in the first category of a culinary immortal. For when it comes to crispiness, the skin on this is one of the crispiest things I’ve ever crunched down on, with a crackle that carries through and reverberates in my eardrums even as I bite down into the layers of meat and fat underneath.
In the dozen or so times my mom and I have made siu yuk over the years, we’ve always defaulted to this stellar recipe, not even bothering to consider any other technique that claims to be better (we’ve tried them all). And not only has this siu yuk recipe not fail us once, it has continued to improve each time we make it. We’ve collectively shared tips and finessed our technique, making iterative improvements along the way. So, this post is a culmination of a recipe years in development and use. It is truly an “ultimate” recipe in my books. So, let’s get started with the seven key steps to a spectacular siu yuk. It’s crunch time.
1. Choose the Right Cut of Pork
Siu yuk is always made with skin-on pork belly. But to get the best results, you’ll want to be picky about the particular cut of belly you get. What we’re looking for here is what in Chinese is called 三层肉, which literally translates to ‘3-layer meat’, meaning there’s a clear distinction between the skin, the fat, and the meat. You might be tempted to go for a leaner cut of pork belly, but that would detract from the glorious gluttony that comes with making your own siu yuk. So, aim for a cut where you can clearly see a fat layer, but also make sure there’s enough meat supporting the slab of pork. A 1:2 of fat-to-meat ratio is usually what I aim for.
2. Poke Holes
Poking holes through the skin might sound odd, but what this does is provides a channel for the moisture from within the skin to escape, allowing the skin to dry out more than it usually would. You might be tempted to use a meat tenderiser for this as it has a lot of pointy ends, but I find they don’t quite prick through the tough pork skin. For the best result, use a really sharp skewer or a chicken-trussing needle.
3. Season the Meat, But Not the Skin
Now this is key part. While seasonings and marinades make the pork taste good, they often contain moisture, and moisture is the mortal enemy of crispiness. So, while you should season the slab of pork belly, leave it all for the meat and fleshy parts, and none on the skin.
4. Chill it in the Fridge
After pricking holes through the skin and seasoning the meat, you’ll want to lay your pork belly out onto a tray and leave it uncovered in the fridge. This step allows the pork skin to further dry out, as the cold air of the refrigerator will sap away the moisture from the skin to another degree. This step is especially useful if you’re living in an especially humid climate like I am.


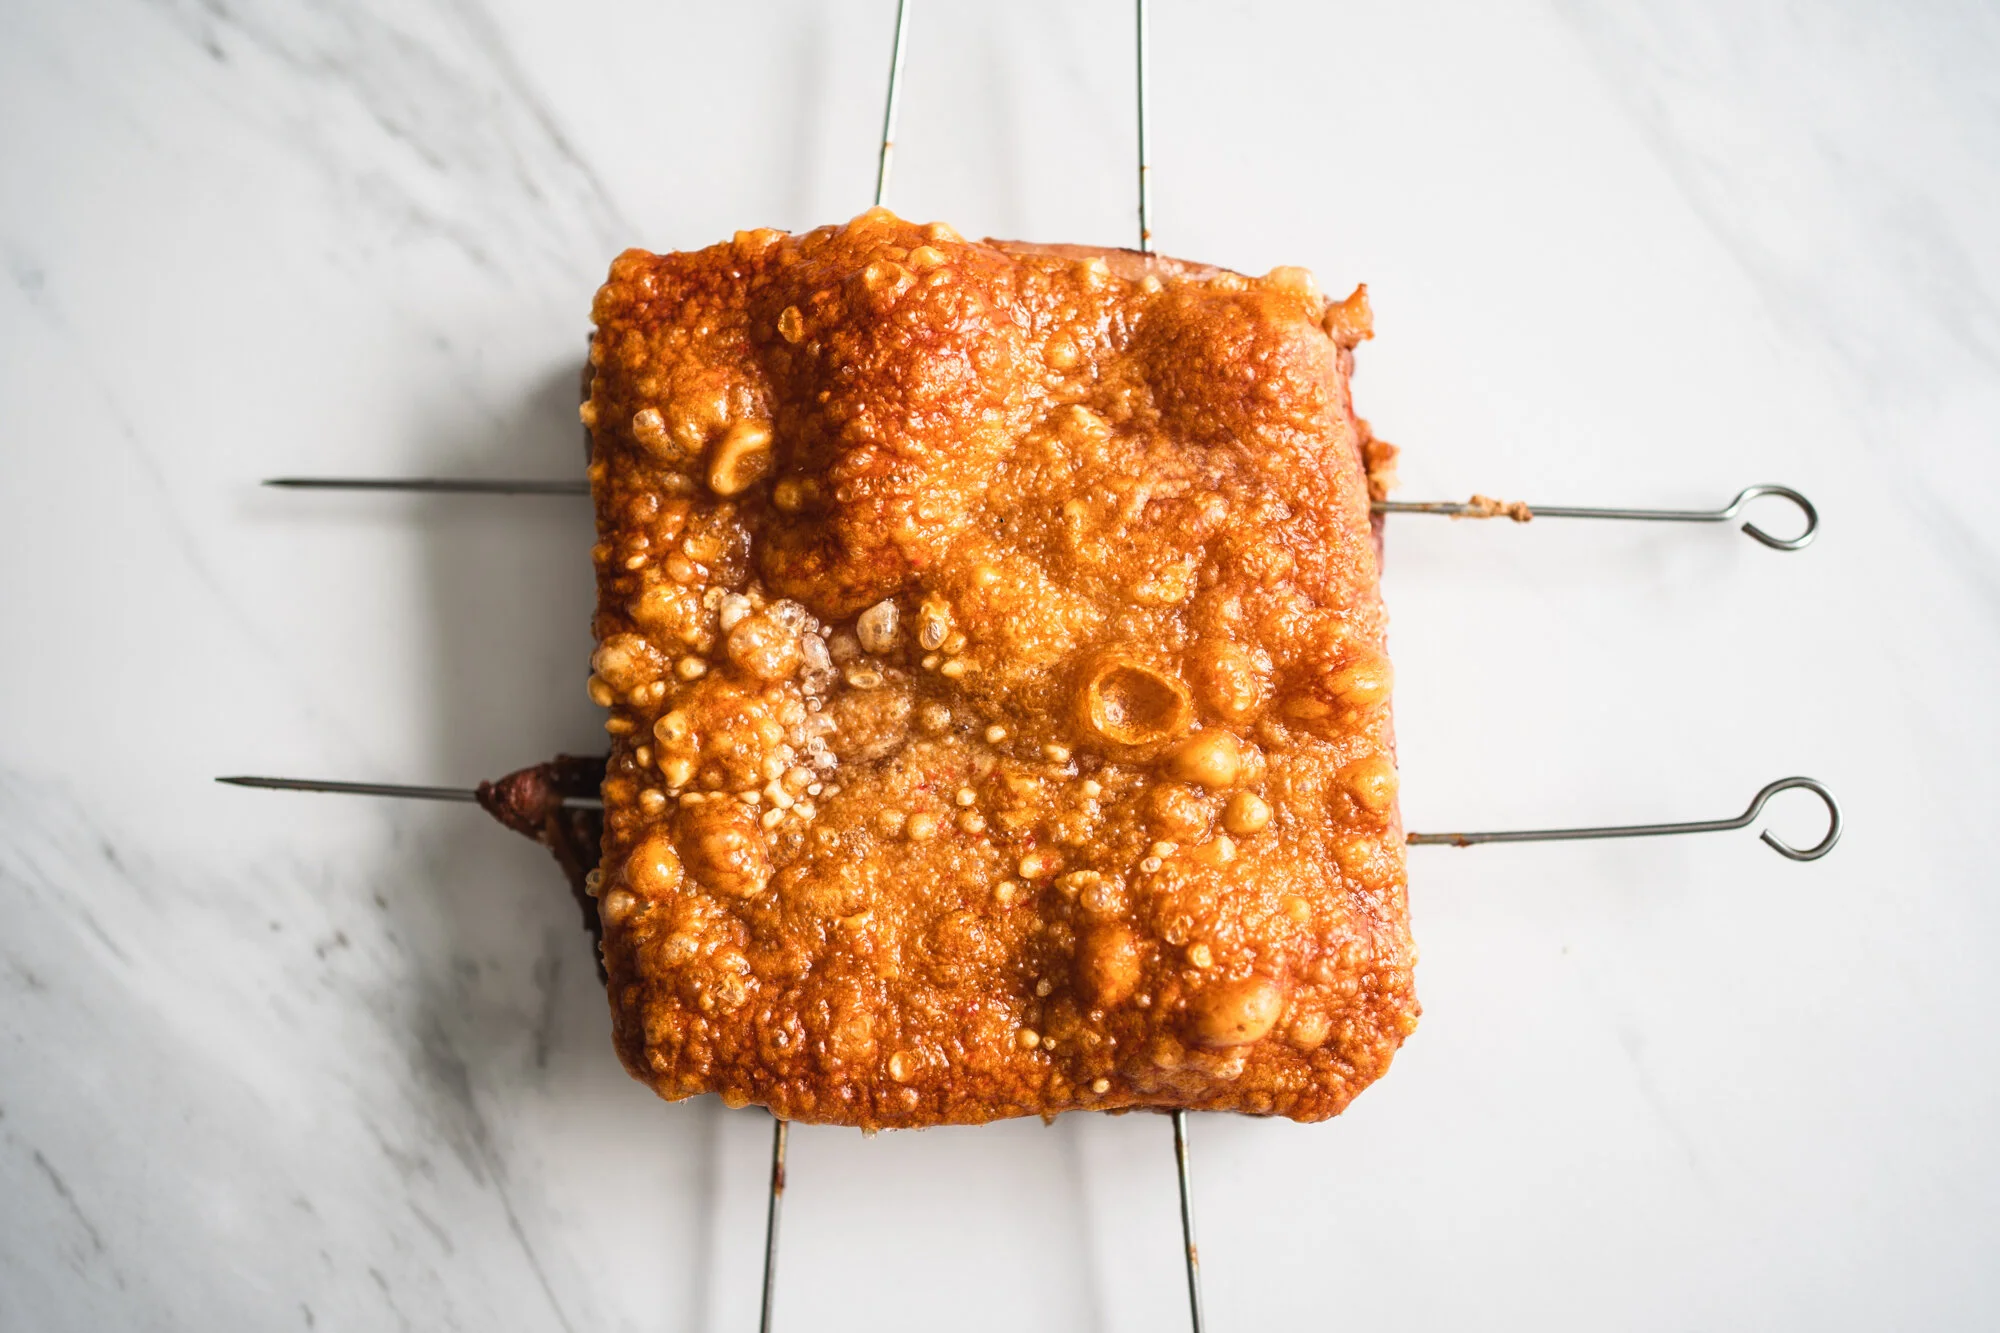
5. Skewer It
Right before roasting, I always skewer the pork belly with 4-6 skewers to make sure the pork belly ends up completely flat on top. This is important especially if the cut of pork belly you have isn’t quite even. The skewers will also keep the pork flat during roasting, otherwise it would buckle in the oven and you’ll end up with pools of pork fat, which leads to not-so-crispy bits of skin. Take your time with this process, making sure to adjust the height of the meat—pushing it up at parts where it sinks, and pushing it down where it’s thick—so it’s completely level.


6. Form the Salt Crust
Now here’s the crux of this whole process—place a thick layer of coarse salt on top of the pork belly, so much that you can’t see the pink of the skin underneath, and then roast it. As the pork belly cook, the salt will draw out even more moisture released from the skin, which will help with crisping it up. Then, halfway through roasting, you’ll remove the salt crust and allow the magic to finally happen as the pork belly skin crackles and pops. Now it might not happen immediately, but be patient, and your time sitting in front of the oven will be well rewarded!


7. Set Up the Oven
I roast my pork belly on a wire rack set in the middle of the oven, and place a deep tray on the bottom rack of the oven. Now this next part might seem a little counter-intuitive, but each time I make this, I’ll pour a kettle of boiling water into the bottom tray. This sounds counter-intuitive, but helps in three ways:
It catches the drippings from the pork, and saves you a whole load of oven cleanup after. Plus you’ll also end up with a great pork stock.
It ensures that the meat remain moist, and doesn’t overcook and burn in the oven from the long cooking process.
But most importantly, it helps with the crispiness of the skin too. Think about how steam not only helps bread to rise, but also aid in creating a burnished crust on sourdoughs as they bake. Well, this does something similar. While I don’t quite know the science behind it—in sourdoughs steam apparently helps by absorbing into the starches and sugars in the dough and allowing it to caramelize further—this totally works for pork belly too.


Siu yuk (燒肉; Cantonese Roast Pork Belly)
Serves 4-6
Ingredients
800g pork belly (get the ones with a clear 3-layer of skin-fat-meat; a 1:1:2 ratio of skin:fat:meat is what I aim for)
30g (2 tablespoons) lam yee (fermented bean curd)
8g (1 1/2 teaspoons) five spice powder
3g (1/2 teaspoon) pepper
1 litre water
150g coarse salt, for the crust
Directions
Prepare the pork: First, let’s get the pork ready for its journey to becoming the best siu yuk. Trim off any uneven sides of the pork belly, and pat it dry with kitchen towels on all sides, especially the skin. Then, with a skewer or a trussing needle, poke holes through the skin in a quick, stabbing motion. You should feel the skewer/needle puncture through the skin to form these tiny holes, but make sure it doesn’t go all the way through into the fat layer. Do this for 200 times, give or take. (I know this sounds like a lot, but it’s a really quick process, and it does make a difference!) In a small bowl, mix together the lam yee, five spice powder, and pepper. Then, rub this marinade on the meat sides of the pork (i.e. the bottom, as well as the four sides), leaving the skin completely free of marinade. Place the pork belly on a tray, and leave it uncovered in the fridge to dry out overnight for at least 12 hours, or up to 36 hours.
Ready the pork for roasting: Take your pork out of the fridge at least 30 minutes before you plan to roast it. Then, poke 4-6 skewers into the sides of the pork to ensure that the top surface of the pork is completely flat. (The skewers also keeps the pork from buckling during roasting.) Pour coarse salt onto the skin of the pork, and gently spread the salt all over the skin until you form an even layer, adding more salt if needed. You’ll know when you have enough when you can no longer see the pink of the skin underneath the salt.
Setup the oven: Set a wire rack in the middle of the oven (this will be for the pork), and place a deep tray on the bottom rack of the oven. Heat the oven to 200°C (fan-assisted convection). Then, bring the 1 litre of water to a boil, and pour it into the bottom rack.
Roast the pork: Place the pork on a wire rack and roast it for 45 minutes. Make sure that the bottom tray of water doesn’t run dry during the roasting process; so top it up with more boiling water if needed. After 45 minutes of roasting, take the pork belly out of the oven, and remove all the salt. The salt should have formed a crust that’s easily removable with a few gentle cracks. Make sure to brush away any straggling bits of salt that’s stuck to the sides too. Then, turn the oven up to 230°C and roast the pork belly for a further 40-50 minutes, or until the skin is completely crispy.
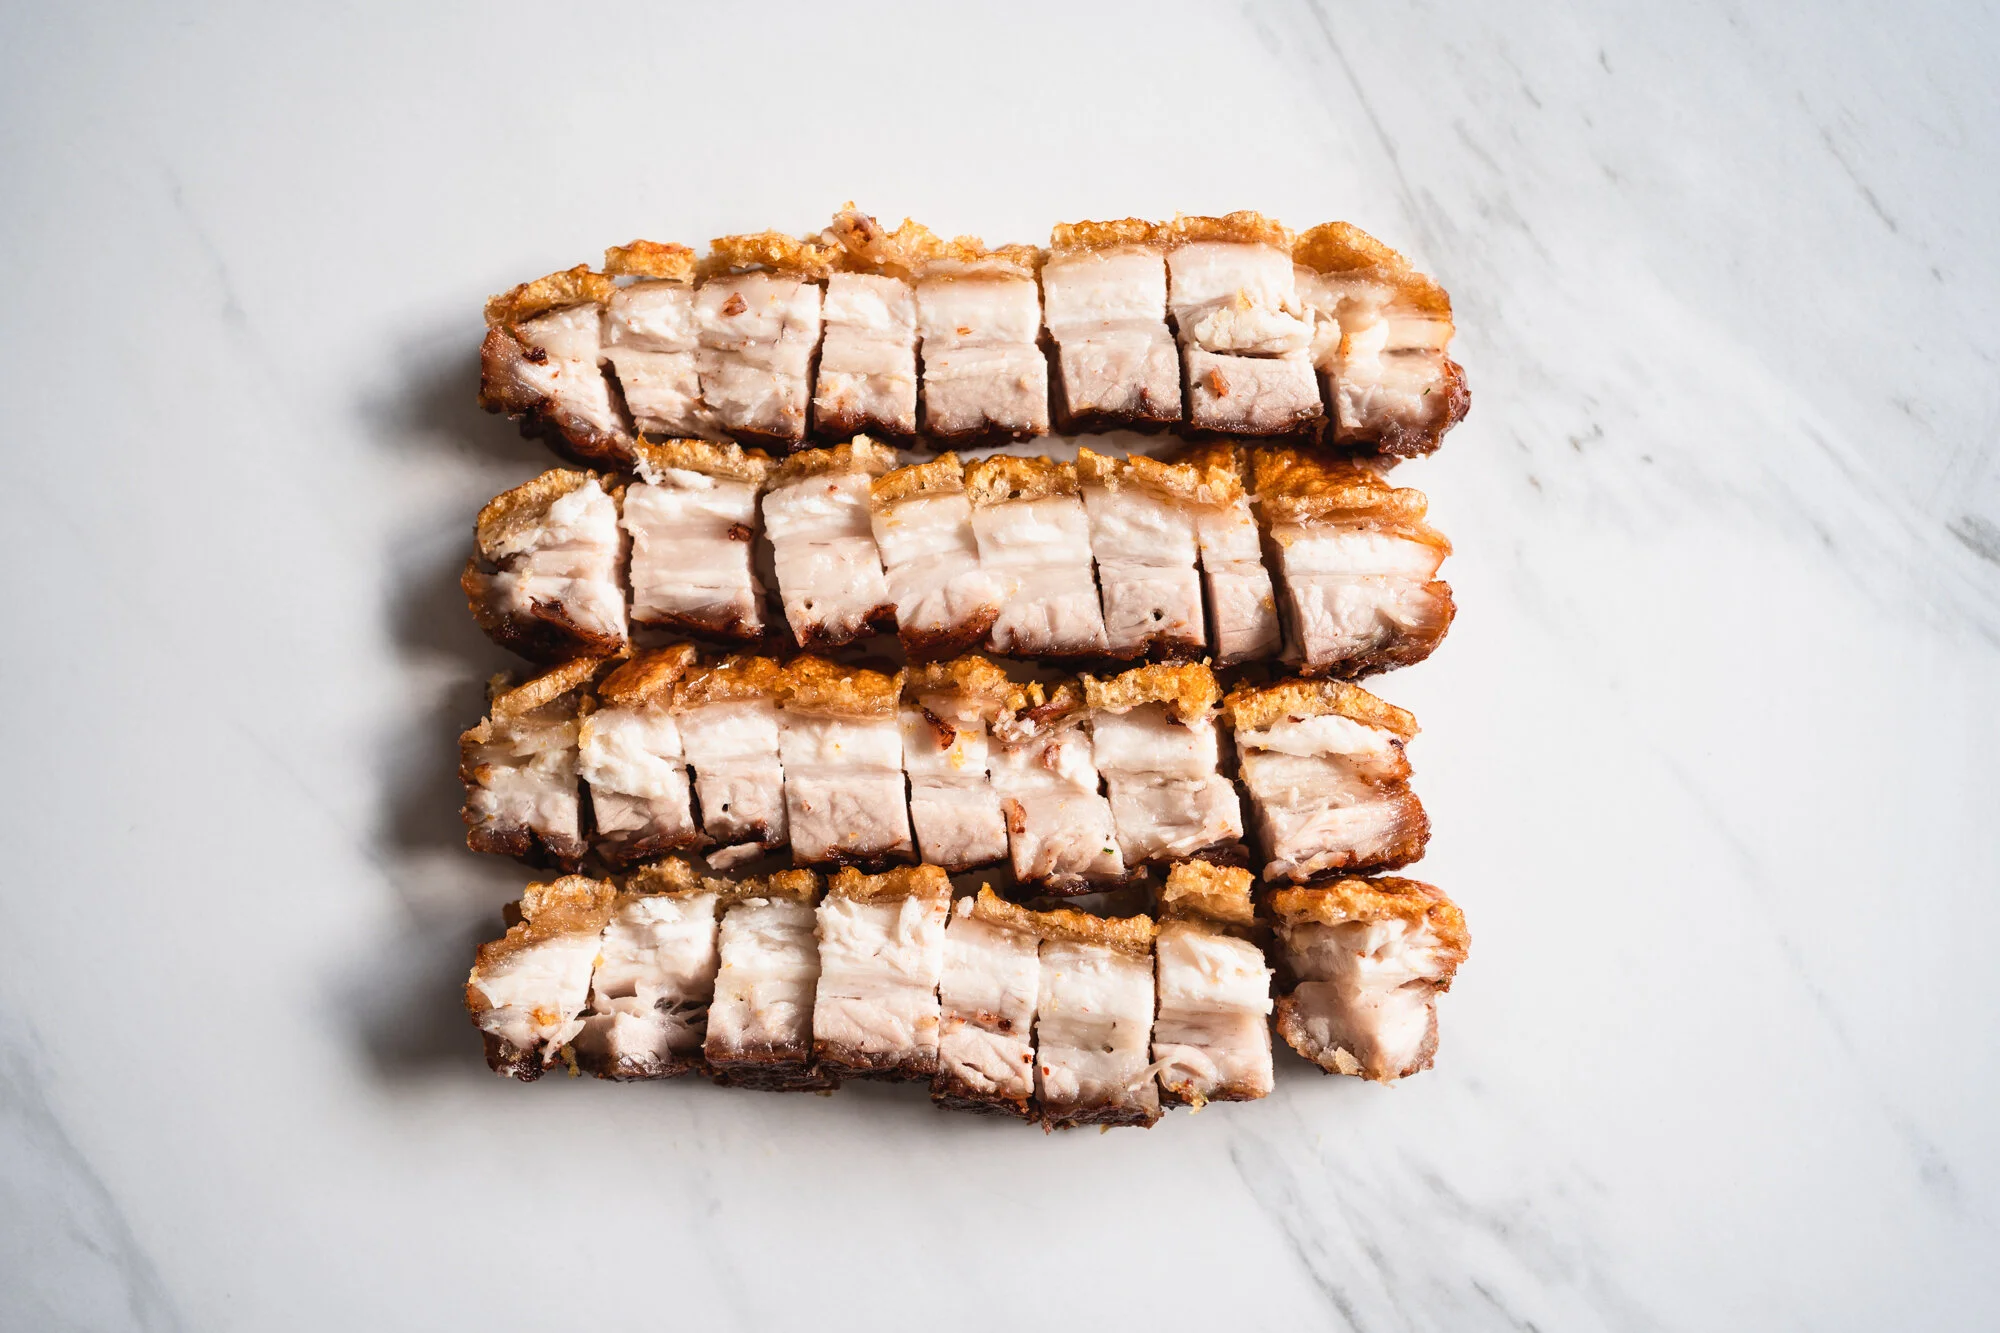
Slice and portion the pork belly: When the pork belly is done, take it out of the oven and let it cool to room temperature before cutting. When cutting and portioning it, it’s best to flip the pork belly over and cut it from the meat side first. For a traditional siu yuk cut, slice the pork into long, 2cm thick strips, then chop each individual strip into 2cm x 2cm thick strips.
Eat!: Now here’s the most difficult part of the process—control yourself from eating too much in one sitting. I’m kidding, there’s no need for control when it comes to siu yuk. Eat, and give in to glorious gluttony!
More Fun Recipes!