Biang Biang Mian
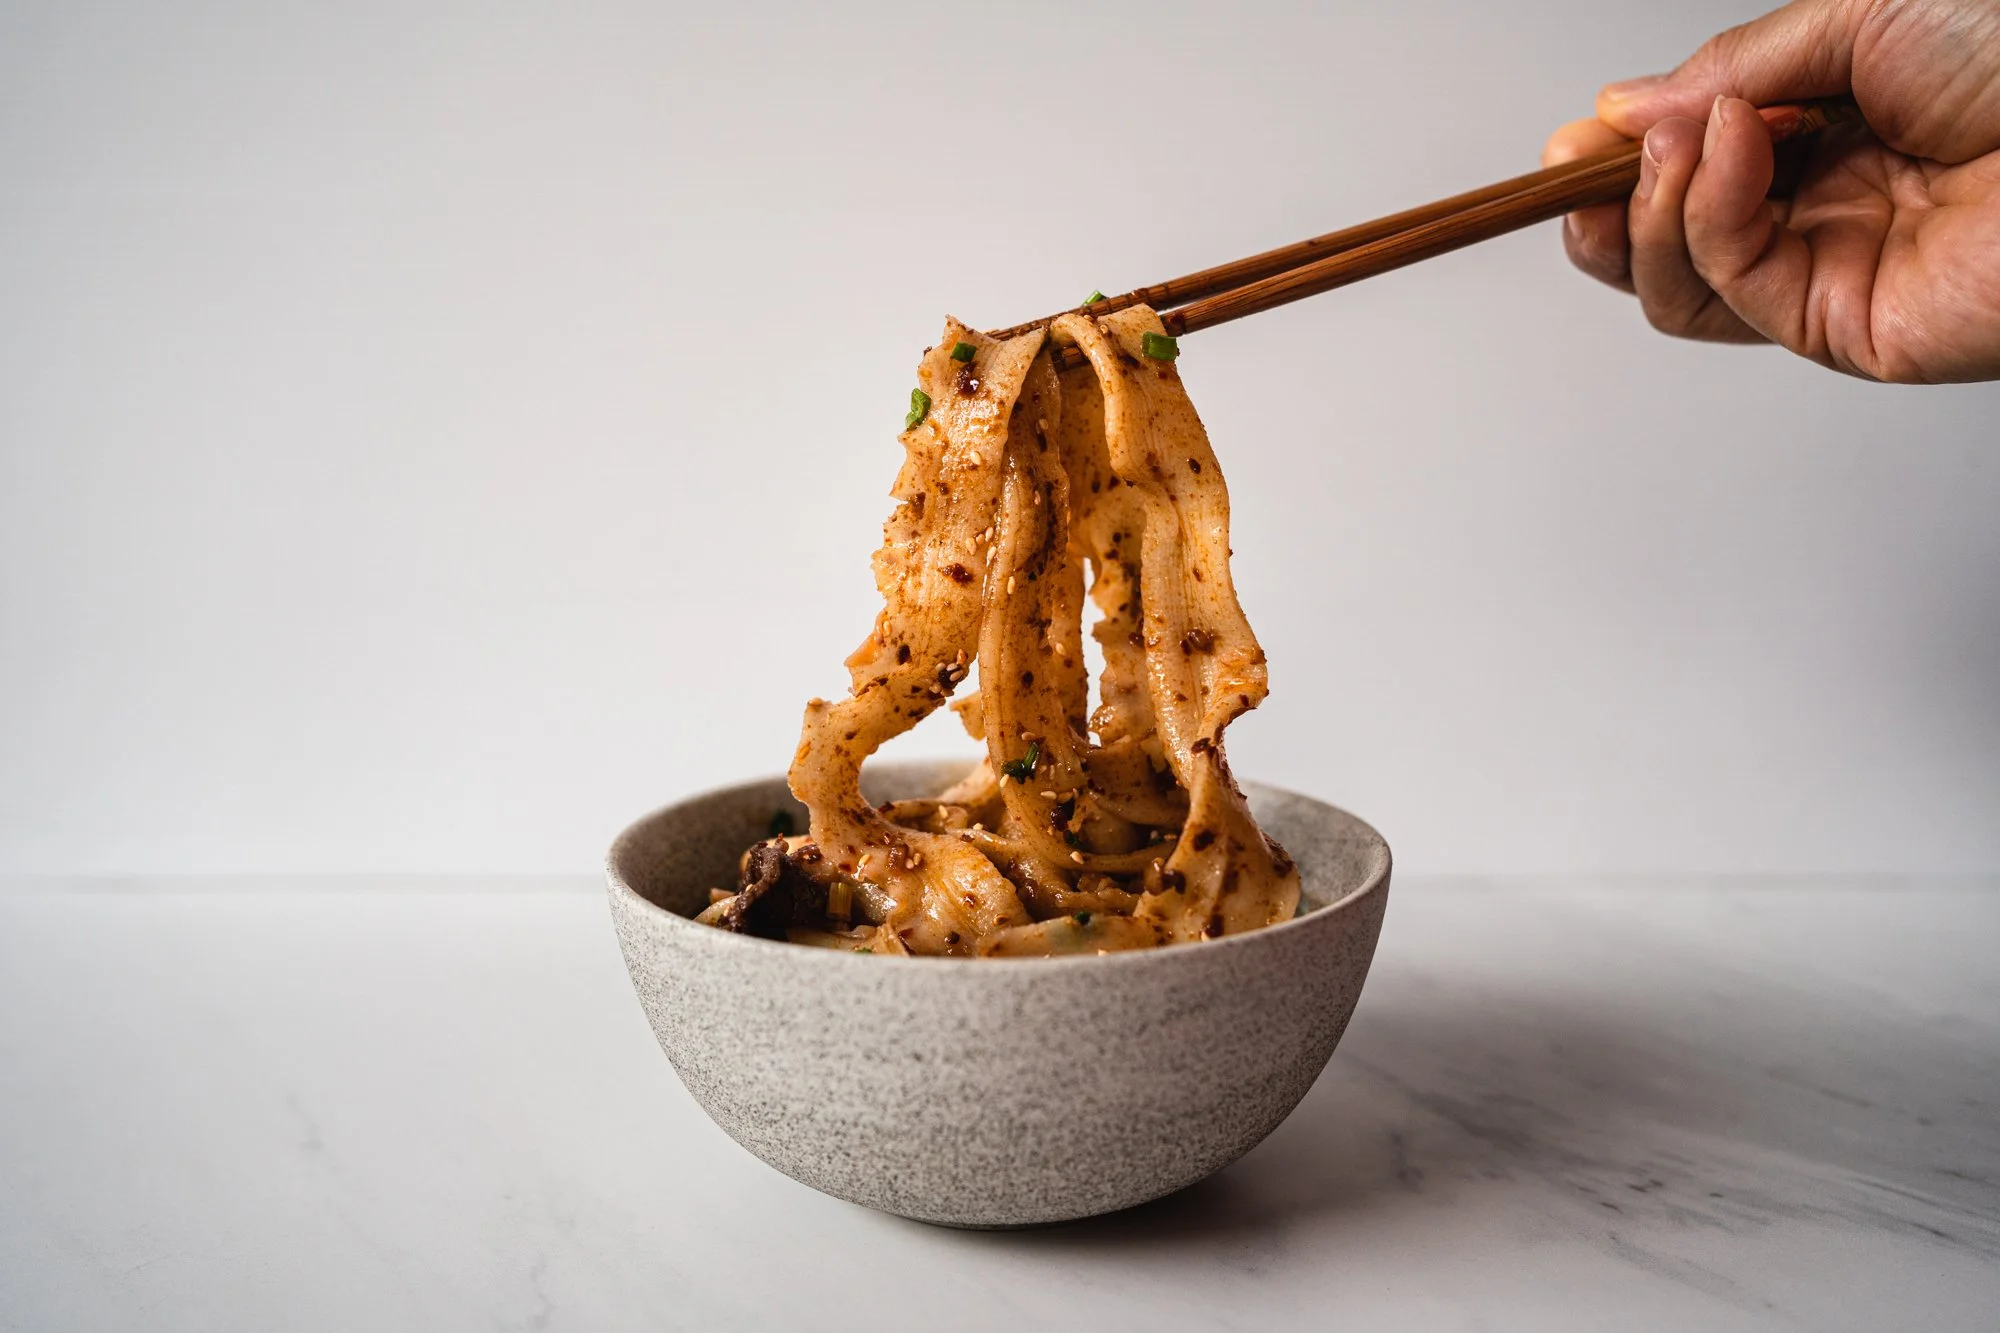
Biang biang mian has risen in popularity in the past years, in large part thanks to Xi’an Famous Foods and their decidedly famous take on the dish—Spicy Cumin Lamb Hand-Ripped Noodles. My recipe here is very much a tribute to theirs, with some slight changes based on my personal preferences, and all done in an Instant Pot!
If you’ve not heard of biang biang mian, the term ‘biang’ is an onomatopoeia for the sound the noodle makes as it’s being made. Because instead of being fed through a roller or extruder (like pasta), or being pulled and multiplied (like ramen or dragon’s beard candy), the noodle dough for biang biang mian is first held firmly in both hands, then stretched apart whilst simultaneously being slapped on a table or countertop. This stretching and slapping action helps maintain the tension in the noodles without causing them to rip apart. (If you can’t quite picture this, here’s a visual demonstration by none other than the cool uncle-owner from Xi’an Famous Foods.)
I’ve made these noodles a handful of times in the past year, and while I’m not quite a sifu at the ‘biang’-ing technique yet, it has made for a super fun weekend meal each time I cook it, especially when I get my family involved.
Now before we get onto the recipe proper, a quick word about the sponsor for this episode—Instant Pot. With this recipe, I thought to try making it all with the Instant Pot, which is billed as a 7-in-1 multi functional smart cooker. And true to its dedication to ‘smart’ cooking and convenience, the process was more convenient with it. Saute-ing the aromatics for the sauce, stir-frying the beef, and boiling the noodles could all be done in one pot, with just a washing step in between. The saute function of the Instant Pot surprised me the first time I used it with how powerful it is, and I definitely did not expect such even, efficient saute-ing from what is often thought to be first and foremost a pressure cooker. The Instant Pot team informed me that it’s all thanks to some nifty internal programming, with a microprocessor that automatically adjusts the heating intensity and temperature. Even without knowing what’s happening under the hood, I certainly appreciated how it made these noodles even quicker to whip up!
So while an Instant Pot isn’t strictly necessary to make these noodles happen—the sauce can be made in a wok or pan, and the noodles can be boiled in a pot—if you do own one, you’re able to cook everything together in one appliance, saving you a round of washup and making sure your cook goes seamlessly smooth as well.
Step by step, recipe by recipe, it seems I’m buying into the Instant Pot cult! 😂 (If you’re based in Malaysia and looking to get yourself one, head to their site here.)


About the Dish
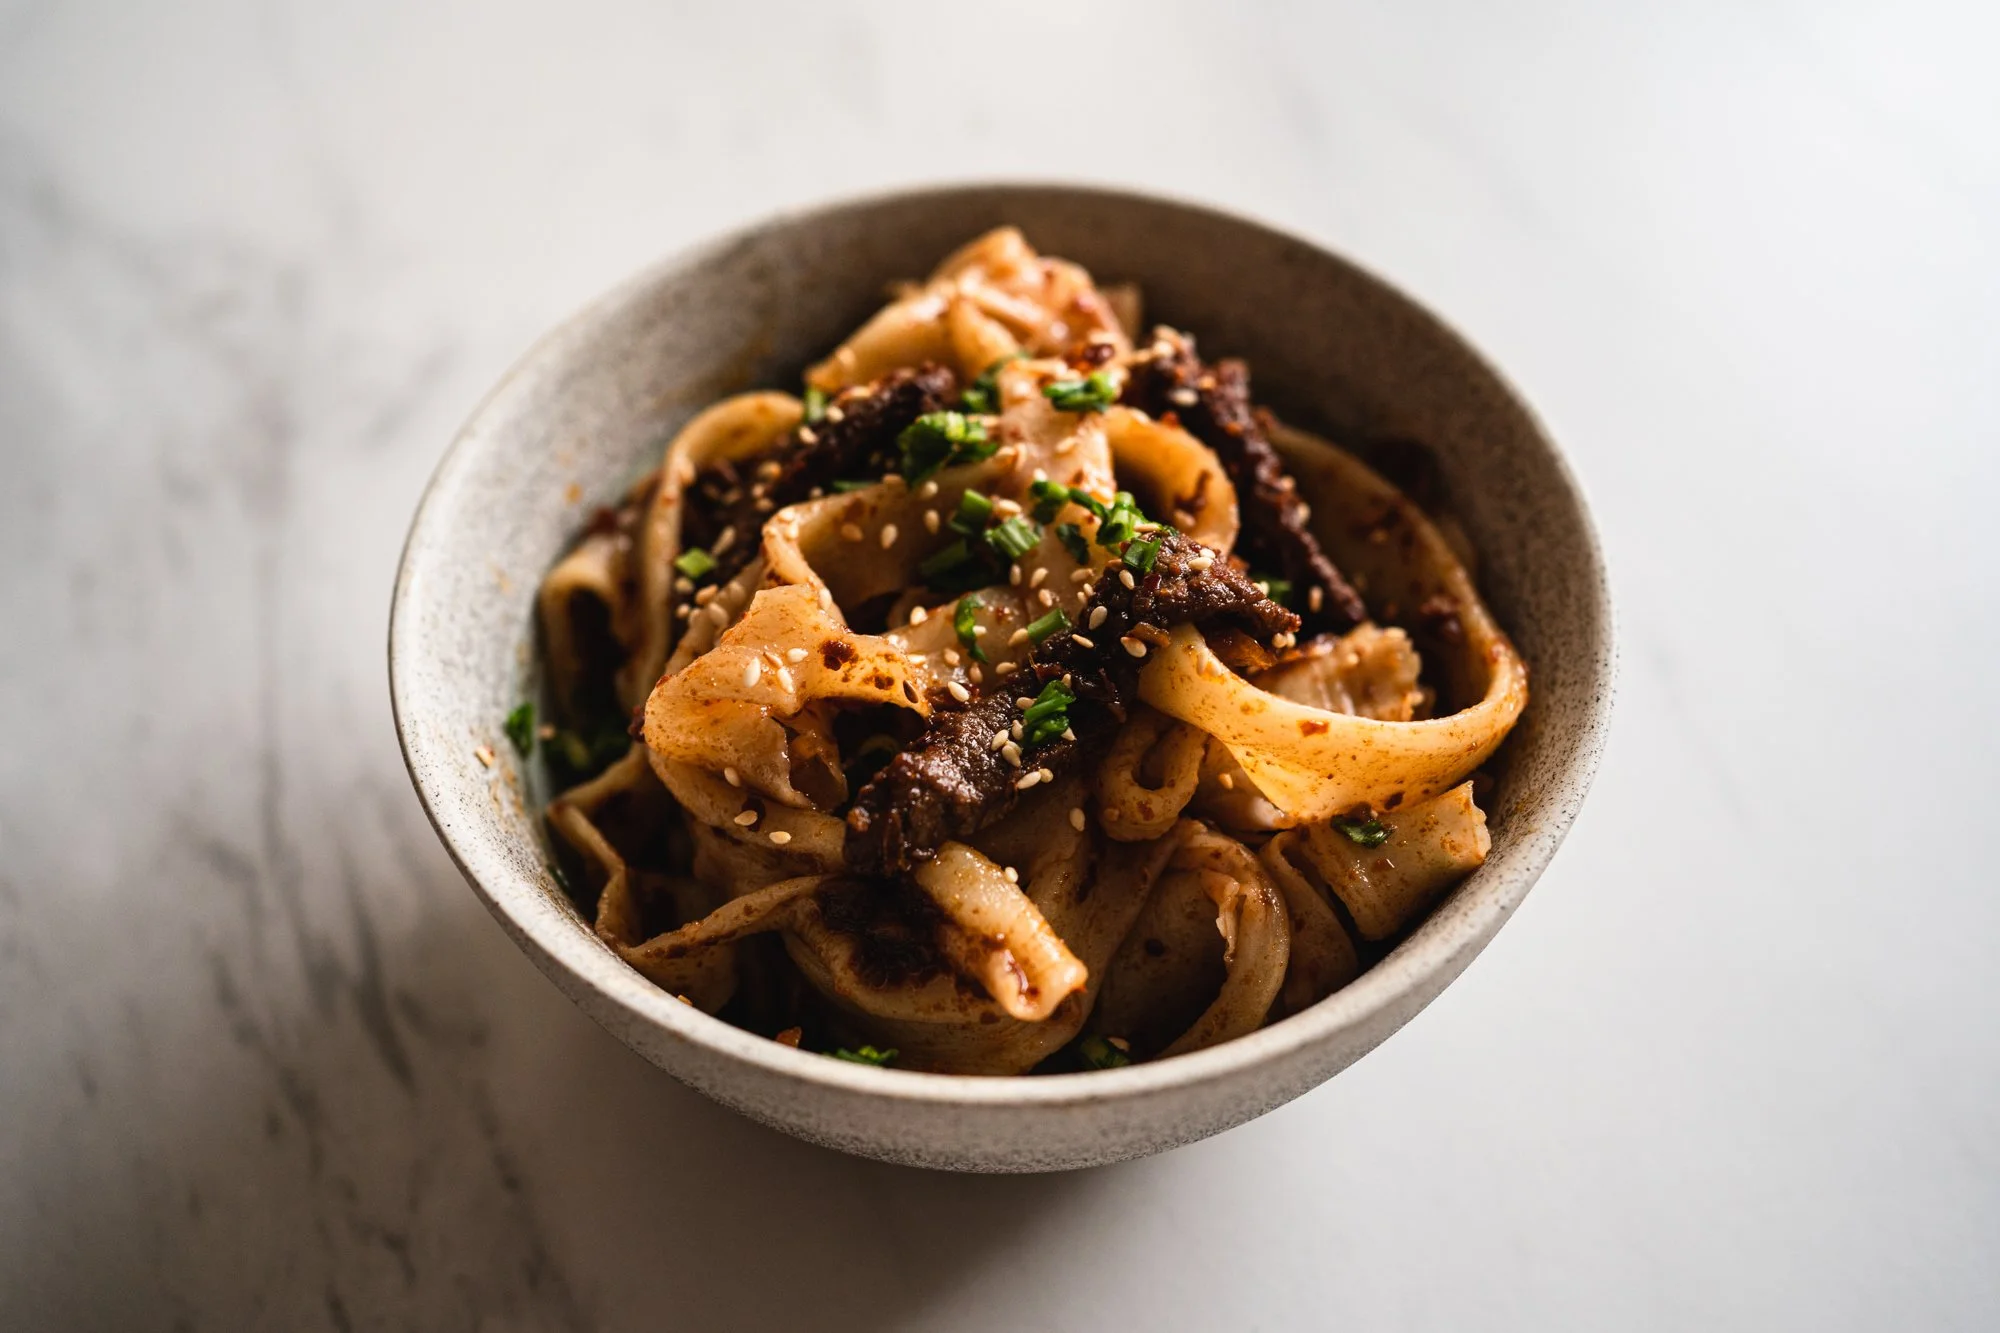
This dish is split into two main parts—the noodles and the sauce. The former provides structure and body to the dish, and the latter holds all the flavour.
The noodle is made from flour and water kneaded together into a smooth dough. (It’s almost like making pasta, but with water instead of egg.) It’s then rested for an hour, before being portioned and stretched into its signature style. (I’ll explain more about the technique in the tips section below.)
As for the sauce, it’s made of a bunch of alliums and aromats, seasonings and spices, sauteed together into a potent, fragrant base. Slivers of beef and lashings of chilli oil is then added to it to really bring this sauce to red, roiling life.
But before we go on, here’s a short bit about the sponsors for this recipe: Instant Pot!
Instant Pot is finally here in Malaysia! After years of hearing about its magic—from a Taste article touting how “The Instant Pot Cult Is Real”, to Melissa Clark’s New York Times piece on how she was “turned into a believer”, to watching Lisa Childs’s YouTube channel dedicate to the one appliance—I was giddy with excitement when I found out it would be sold here. And as luck would have it, with its arrival to my motherland, I got asked to test out the Instant Pot and come up with a few recipes for it. So for the next couple of weeks, I’ll be sharing a few Instant Pot recipes that will build on the wealth of Instant Pot recipes that are already out there, but with a few surprises in store!
Tips for Success
There are plenty of tips to make a successful biang biang mian. Here are some I’ve found to be extra helpful:
Flour for the noodles: Many recipes call for bread flour for the noodle dough, but in my experience, all-purpose wheat flour gives you a dough that’s stretchier and easier to work with. I used superfine flour with 9% gluten content.
Resting the dough: This is a crucial step in the making of your noodles. A well-rested dough allows the gluten in the flour to fully hydrate with the water, and almost relax after being tensed up from the kneading process. (I know this isn’t a very scientific explanation, but if you’ve made and felt bread or any dough-based dish, you’ll know the feeling.) In this recipe, I rested the dough twice—about an hour’s rest after the dough is first kneaded, and a short 5-10 minute after the dough is flattened and portioned out.
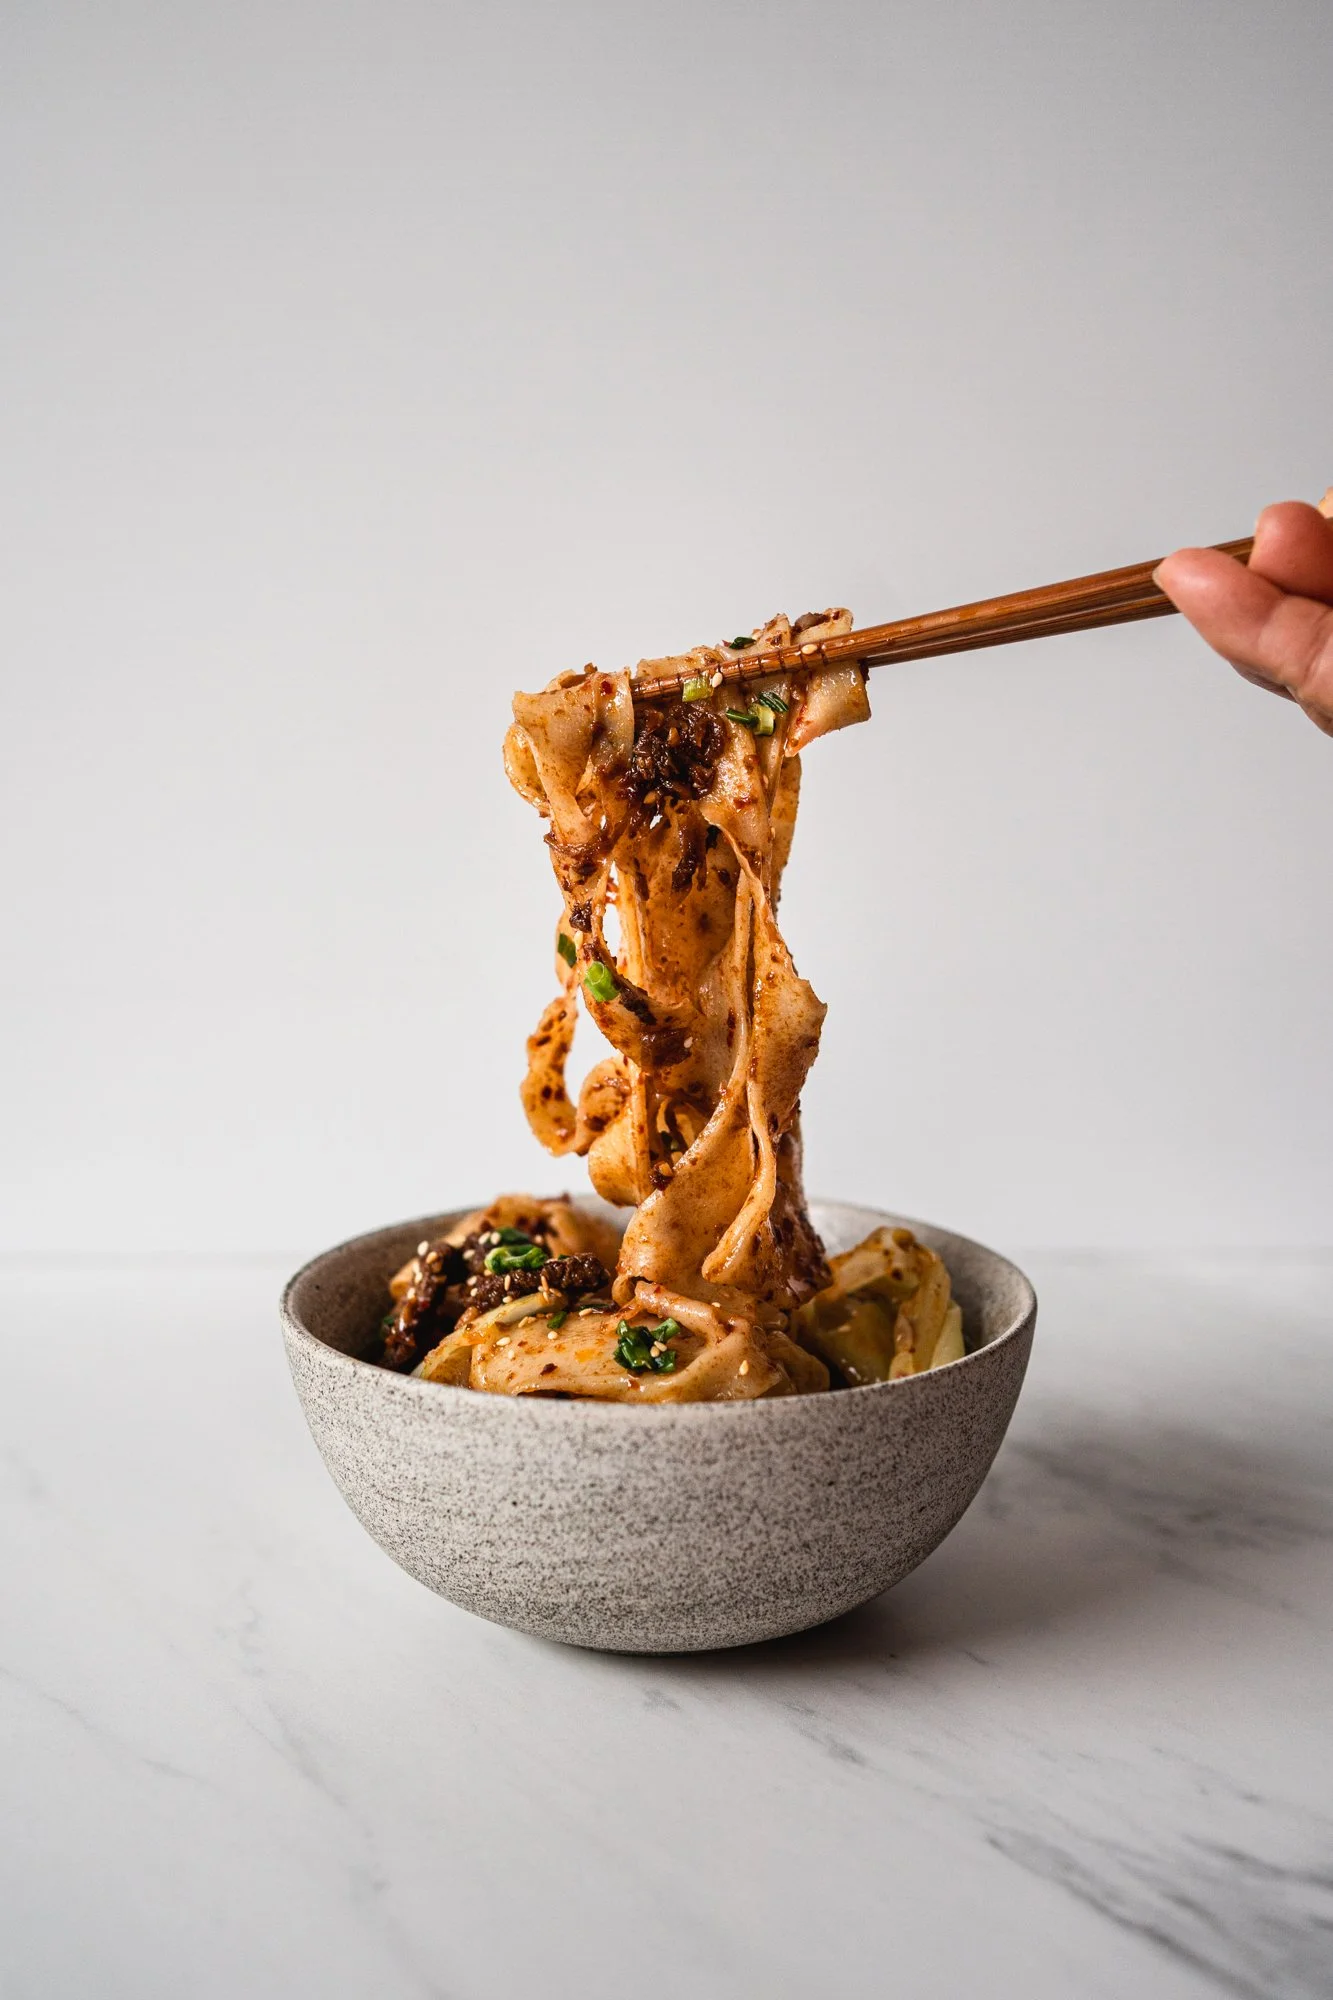
Biang biang method: This is a seemingly tricky technique to master, but if the dough is the right consistency (smooth and springy), and well-rested from before, it’ll be a breeze. The trick is to keep the dough in tension as you pull it apart and slap it on the table, not giving it any slack. Pro noodle makers can stretch the dough out to their arm span, but don’t fret if you can’t pull it to such lengths without breaking it. Once you see the noodles thin out and become almost translucent at one spot (usually where you’re gripping it), stop pulling, or shift your hands and grab on to a different part of the dough so it doesn’t break. If your noodle is still really thick, feel free to use a rolling pin to roll it out. When the noodles are pulled (or rolled out) to your desired length, you have the optional step of pulling it apart in the middle so it’s split lengthwise. (Watch this for a visual demonstration.) I’d suggest giving this a go as this makes the noodle even thinner and less of a mouthful to eat.
Type of meat: I strayed away from the Xi’an Famous Foods version of the dish, using beef instead of lamb in mine. Both work excellently, so feel free to swap things up based on your personal preferences. I’ve also tried this with chicken and pork, which makes the dish less bold and meaty, but works well too. You can even use mince or ground meat instead of slices.
Instant Pot setup: An Instant Pot isn’t strictly necessary for this recipe, but if you do have one, it does make things easier as you can make everything in it, with one extra washing step in between. For the sauce, we’ll be using the saute function. Then we’ll clean out the inner pot, and use it to boil water to cook the noodles in. You can boil your water in a kettle and pour it into the Instant Pot, or boil the water directly in the Instant Pot itself. If you’re going with the latter, fill the inner pot 3/4 full with water, cover it with the lid (making sure the release valve is on sealing), and turn on the high pressure function and set it for 10 minutes. The Instant Pot will display ‘on’ while it heats up. The heating up process will take roughly 6-8 minutes, and once you hear the Instant Pot beep and the 10-minute timer start, you can turn it off and open the lid.


Biang Biang Mian
Serves 3-4
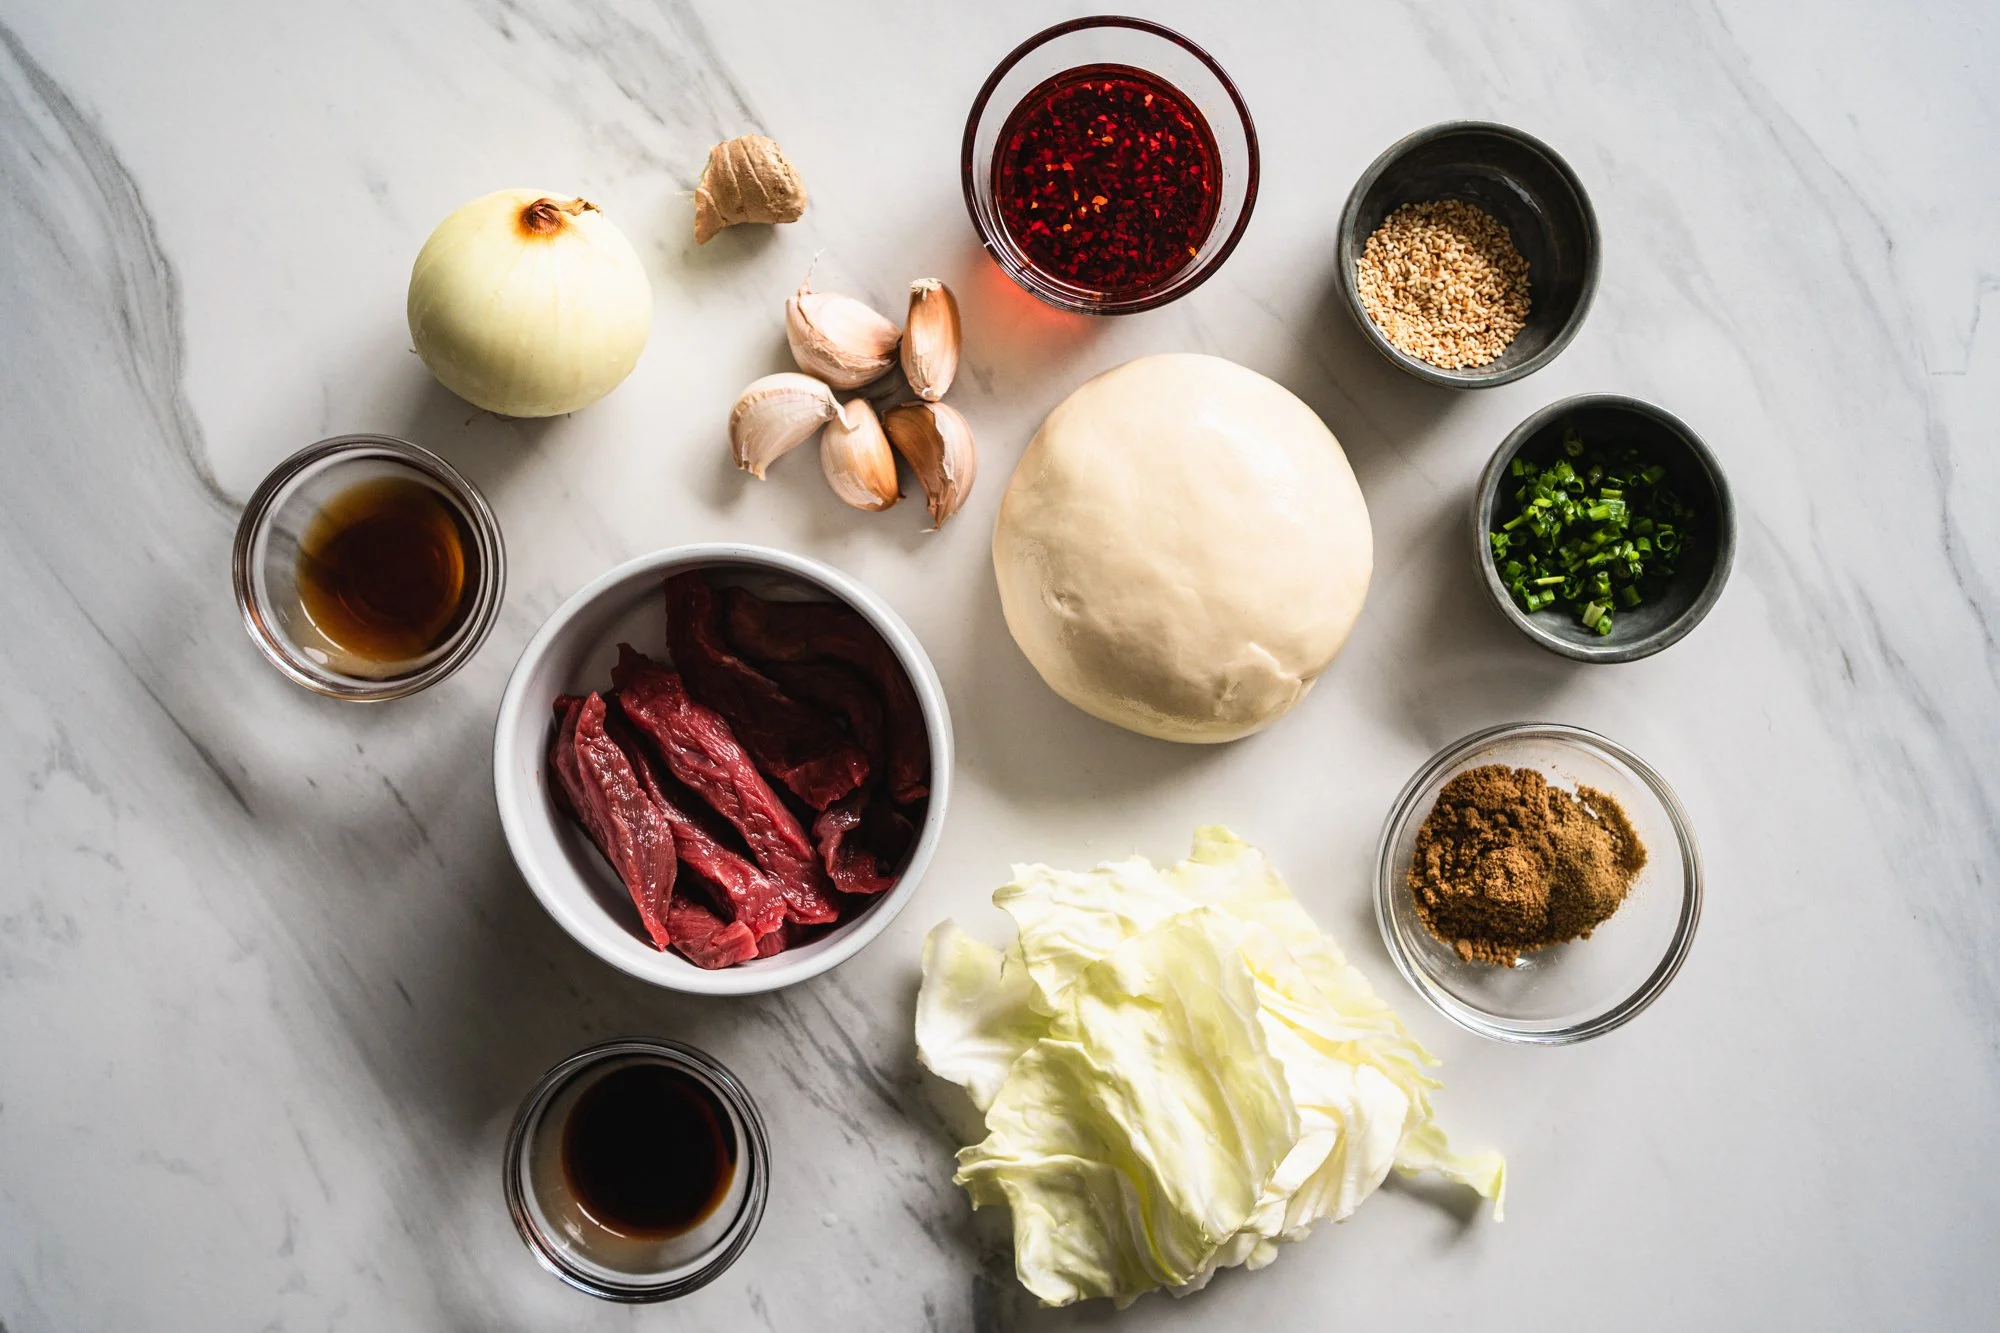
Ingredients
Biang biang noodles
240g (2 cups) bread flour
3g (1/2 tsp) salt
135ml water (1/2 cup + 1 tbsp) water
15ml (1 tbsp) vegetable oil
Sauce
30ml (2 tbsp) vegetable oil
1/2 medium onion, thinly sliced into half-moon shaped
5 garlic cloves, minced
1 thumb-sized piece of ginger, minced
6g (1 tbsp) cumin powder
2g (1 tsp) coriander powder
1g (1/2 tsp) ground white pepper
200g thinly sliced piece of beef or lamb
15ml (1 tbsp) light soy sauce
15ml (1 tbsp) Shaoxing wine
10ml (2 tsp) black vinegar
45ml (3 tbsp) chilli oil, or more to taste.
2g (1/2 tsp) salt
3-5 white cabbage leaves, torn into pieces
10g (1 tbsp) toasted white sesame seed, to garnish
2 stalks of scallions, thinly sliced, to garnish
Directions
Make noodle dough: The dough can be made either by hand or with a stand mixer. I’ll be explaining the stand mixer method, but the timings work for a hand-kneaded method too.) Combine the bread flour, salt, and water in the bowl of a stand mixer, and knead with the dough hook attachment for 5 minutes on medium-low speed. Check on the dough; it should have come together into one and there should be very little dough sticking to the sides of the bowl. (At this point, if the dough is still looking very sticky, add in some more flour, a teaspoon at a time, and knead until it releases from the walls. Conversely, if the dough is looking very dry and shaggy, add in a teaspoon of water at a time until the dough becomes one.) Continue kneading for another 15-20 minutes, until the surface of the dough is smooth and elastic. When done, transfer the dough to a well-oiled bowl, and let the dough rest for 45-60 minutes.
Make sauce: While the dough is resting, turn on the Instant Pot and set it to the saute setting. Alternatively, heat up a pan over medium heat. Then, add in the vegetable oil and sliced onions and sweat for 3-5 minutes, making sure it doesn’t burn. Add in the minced garlic and ginger, and sweat for a further 2 minutes. Then, add in the cumin powder, coriander powder, and white pepper. Let the spices bloom and activate for 1 minute, before adding in the slices of beef. Stir-fry the beef for 3-5 minutes, making sure it’s completely cooked with just a hint of caramelisation. Then, add in the light soy sauce, Shaoxing wine, black vinegar, chilli oil, and salt. Stir-fry for another 2 minutes, before transferring all of the sauce into a bowl that is sufficiently large to mix the noodles in for later.
Noodle cooking prep: Clean out the Instant Pot. Then, fill it 3/4 full with boiling water from a kettle, or you can boil the water directly in the pot itself. For the latter, cover the Instant Pot with the lid (making sure the release valve is on sealing), and turn on the high pressure function and set it for 10 minutes. After 6-8 minutes, once you hear the Instant Pot beep and the timer starts, you can turn it off and open the lid. Keep the water on a rolling boil with the high power saute function, and season the water liberally with salt, so it's as salty as the sea. Alternatively, you can also use a regular large pot and bring your water to a rolling boil on the stovetop.
Portion and rest noodles: Flip out the dough onto a table, and using a rolling pin, roll it out into a rectangle roughly 25cm x 10cm (10 inches x 4 inches), and divide the dough into 8 even pieces, each 10cm x 4cm (4 inches by 1.5 inches). Let the noodles rest on the countertop, covered, for 5-10 minutes.
‘Biang’ noodles: This is the fun bit. Working with one piece of dough at a time, hold each end of the dough in each hand, and gently pull the dough apart while slapping it on the countertop or work surface. With a few slaps, you should be able to get the dough to around 60cm (2 feet) long, if not longer. (If the technique is failing you, feel free to use a rolling pin to roll out the noodles.) When the noodles are to your desired length, pull the noodles apart lengthwise in the middle.
Cook noodles: With each piece of noodle you pull, drop it into the boiling water and let it cook for 45-60 seconds. (Though If your noodles are extra thick, they might take longer than this.) The noodles are done when they float. Remove it from the water with tongs or a sieve, and transfer it into the bowl with the sauce. As each batch of noodle cook, feel free to pull the next one and drop it into the water, getting into a rhythm of pulling and cooking dough until all the dough is cooked, and combined with the sauce. Finally, add the cabbage leaves into the water and cook it for 30-45 seconds, and add them into the bowl with the noodles as well.
Portion and serve: Toss the noodles and cabbage through the sauce so everything is well mixed. Then, portion it into individual bowls, and garnish with the sliced spring onion and sesame seeds. Slurp away!
More Fun Recipes!